|
|
| |
| |
05.01 How Do I Use the Takeoff Tab?
| Last Updated: 2022-05-09 08:21 |
The Takeoff Tab is where you'll likely spend most of your time when you use ConstructConnect Takeoff, so this is the longest Chapter in the User Guide. By the end of this Chapter, you should have a good understanding of the Takeoff Tab including:
- All the toolbars and context menus and buttons
- All the Panes and lists and how to dock and undock panes
- How to view plans, takeoff, and annotations
On the Takeoff Tab you: - View your plans (drawings, blueprints)
- Create and manage Takeoff Items, Typical Groups, and Punch Items
- Create and Manage Areas, Typical Areas, Layers, and Named Views
- Draw annotations such as highlights, ink, stamps, and clouds
- Add text to your drawings
- And, probably most important, measure the various building objects on your plans.
Because you spend so much time on the Takeoff Tab, it is important to take some time to learn how it works, this Chapter covers the Takeoff Tab and all its components thoroughly. The Takeoff Tab includes several key regions, each described briefly below and detailed in the articles that follow. 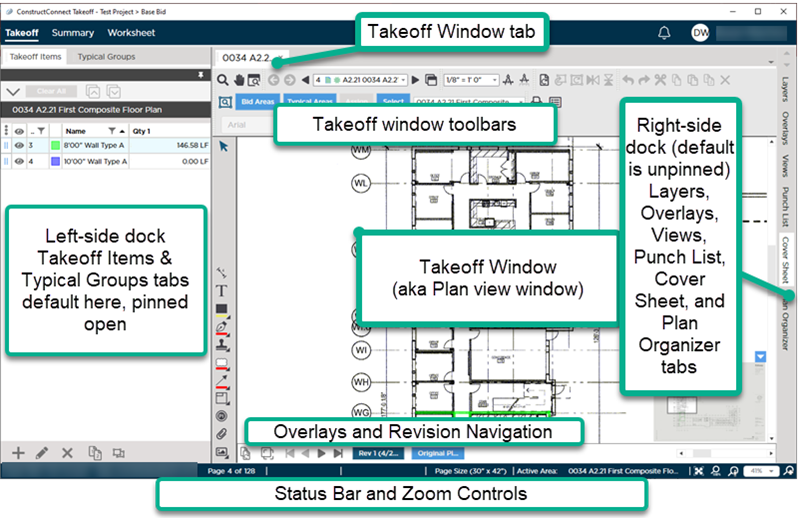
The screenshot above shows the default layout of the Takeoff Tab with the Takeoff Items and Typical Groups Panes expanded and docked on the left, and the Overlays, Layers, Punch List, and Views Panes expanded and docked on the right. Each side of the Takeoff-Summary-Worksheet window acts as a dockbar where you can dock the Takeoff Items, Typical Groups, Views, Overlays, Layers, and Punch List Panes. These docked Panes can be pinned open or allowed to slide into the side of the application, depending on your needs and the size of your monitor. Individual Panes can be undocked from the main application window, if you have the screen space or multiple monitors. When you close and reopen the program, all your undocked Panes open where they were when you closed the application. You can open up to 10 Additional Takeoff Windows - and undock or dock these as you see fit, however when you close and re-open the program, only the initial, docked Takeoff Window is opened. | Region | Description |
|---|
|
| Application toolbar | The Application toolbar is common to all screens in the application and provides access to Alerts, Settings, and your Profile Menu (which gives you access to Settings, Masters, Help, and Support options). The Application Toolbar allows you to switch between the Takeoff, Summary, and Worksheet Tabs for the current Bid. | | Takeoff Window tabs | The Tab Toolbars shows a tab for each Takeoff Window open in the current Bid. | | Takeoff window toolbar | Each active Takeoff window includes its own toolbar with a Sheet Navigator (for changing the Sheet being viewed), Bid and Typical Area drop-downs and controls, Scale setting, and Sheet rotation controls, along with other tools. | | Left-side Dock (or Dockbar) | By default, the Takeoff Items and Typical Groups Panes are docked on the left-side of the application and the dock is pinned opened. Each Pane can be undocked independently. Panes from the left-side dock can be undocked completely or moved to the right-side dock, however you choose to customize the layout. | | Takeoff and Annotation Toolbars | There are two toolbars that run down the left side of the application (to the right of the Takeoff Items and Typical Groups Panes, if docked and pinned open, or along the edge of the application). The Takeoff Toolbar that displays when you select a Takeoff Item (buttons vary depending on what Type of Takeoff Item you select), and the Annotation toolbar, which provides access to tools and functions not related to specific Takeoff Items (such as text, ink, highlighting, clouding, dimension lines, Punch List items, and more). | | Takeoff (Plan View) window(s) | This is where your Page (sheet, plan, image, drawing, electronic plan) is displayed along with all takeoff, annotation, Punch list items, Named Views, and Typical Group frames/markers placed (stored) on that Page. Using either a Takeoff Items Takeoff tool or one of the other Tools, one 'marks up' the sheet in this window. Up to 10 separate Takeoff windows can be opened per Bid. When accessed from a Hot Link, Named Views open in a separate "Named View" takeoff window that is color-coded with a green tab. | | Right-side Dock (or Dockbar) | By default, the Layers, Overlays, Named Views, and Punch List Panes are docked on the right-side of the application and the dock is pinned opened. Just like the left-side dock, you can customize the Panes in the right-side dock and move them wherever you like. | | Pan Window | This is a small representation of the entire plan with a smaller box (the Pan Indicator) that indicates what portion of the plan currently displays in the Takeoff Window. | | Revision Navigator and Overlay Controls | Each active Plan Set creates a tab at the bottom of the Takeoff Window which allows you to navigate between the different versions or revisions of a Page.
This control also provides access to the Overlay toggle and selector (Overlays allow you to compare two revisions to see what is changed, see Related articles for more information). | | Status Bar | The Status Bar is located at the bottom of the application and displays the Organization and User, the index number and total number of Pages in the Bid, and information about the current piece of takeoff you are drawing or have selected. | | Plan Info, and Zoom Controls | This region displays, plan information such as the the Sheet size (for the active Takeoff window), the Active Area (Bid Area or Typical Area), and houses the Sheet Zoom controls. |
The next several articles cover these Panes and Toolbars in detail. Remember, when you're using CC-Takeoff, most of your time is spent on this screen - set yourself up for success and invest a little time in learning how the Takeoff Tab and all the tools and controls on it works.
|
|
|
|
|
| The information in this site is protected by copyright by ConstructConnect. You may not reproduce, adapt, or publish any content from this site in whole or in part for any purpose, without the express written consent of ConstructConnect, Inc.Copyright 2023 - All Rights Reserved. |
|

 What is Takeoff?