|
|
| |
| |
06.03 Adding a New Takeoff Item and Selecting the Appropriate Type
| Last Updated: 2022-02-18 10:15 |
Takeoff all starts with a Takeoff Item (previously called "Conditions") - a representation of some building object you want to measure or quantify.
There are many ways to create or add Takeoff Items to a bid, we are going to start with the basics, creating one from scratch.
This article, and those that follow, assumes you are creating a Takeoff Item from scratch. There are many other ways to add Takeoff Items to a bid such as: copying a Takeoff Item from another bid, inserting a Takeoff Item Template, or adding a Template Group. These are covered later in this Chapter. In the Takeoff Items Pane (by default, docked and expanded/opened on the left side of the application),
Click the  button, a pop up opens where you can select the Type of Takeoff Item you want to create... button, a pop up opens where you can select the Type of Takeoff Item you want to create...
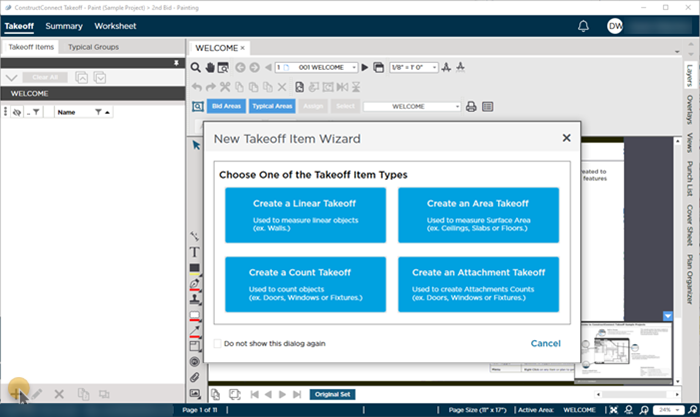
Select the Type of object you need to measure based on how you would normally view the object in your plans. We cover each Type of Takeoff Item in the articles that follow, use the explanations and examples below to determine which Style you need.
If you prefer not to see the Takeoff Item Wizard pictured above, just click the "Do not show this dialog again" - the next time you click the button, a blank Takeoff Item Properties dialog box opens. Choosing the Appropriate Type of Takeoff Item to Create
Here are a few examples to help you pick a Takeoff Item Type:
- You are measuring walls and even though you are probably interested in the length of the wall (for framing), you also may need the the surface Area (for finishing). Very likely, you are using an orthographic projection (OP) to measure the walls on the plan (from a bird's eye view), so you would use a LINEAR Takeoff Item. Just because you use a Linear Takeoff Item does not limit the Takeoff Item's results to LF. As long as you provide Height and Width (of the wall), the program can calculate area (SF) and volume (CF). You use a Linear because that is the best tool to measure walls on an OP.
- What if you need to measure the amount and number of acoustical ceiling tiles needed for a space (or a concrete pad, or carpet, or vinyl tile)? Again, the plan is likely an OP so you measure this (take it off) as using an AREA Takeoff Item. Even though you need the volume, for example, for concrete, you measure the building object on the plan as area, then calculate out the volume. The program can calculate several results for area takeoff, including area (SF), perimeter (LF) and volume (CF). The reason you use an "Area" Takeoff Item is because that is how you draw measurements on the plans.
- Lastly, you need to count the number of windows on an exterior wall (or light boxes in an ACT ceiling, or doors, or objects that you would normally quantify as an "Each". Here, you have to make a choice - you can use a Count or an Attachment Takeoff Item, depending on:
- If you only need the number of windows and maybe the amount of molding (the perimeter), you can use a COUNT Takeoff Item and draw your takeoff on an Elevation or on an OP - it really does not matter, you are marking off every place that the object occurs and then just multiplying out some other value.
- If you need to know the number of windows (and maybe the amount of molding) and at the same time, you want to deduct the window opening area from a wall (to account for the reduced amount of drywall, painting, brick facade, etc.), you would use an ATTACHMENT. Attachments can be placed on linear or area objects. How you setup the Attachment Takeoff Item depends on how you measure (or measured) the parent takeoff. Are you using on an orthographic projection or an elevation? What Style of Takeoff Item did you use to measure the parent (linear or area)?
- If you know the measurement for a Takeoff Item (the number of Windows on the plan, or the total surface area of concrete, or the total run of a wall) and do not need to see takeoff objects on the plan, but only want to account for those building objects, you can enter the quantity for any Takeoff Item on the Worksheet Tab manually. See Adding and Removing Manual Results on Worksheet Tab for details.
The New Takeoff Item Wizard (Style Chooser) sets the initial Takeoff Item Properties fields to the selected Style, but you can change the Style in the Takeoff Item Properties window. For example, if you clicked "Linear" but realize you need to create an "Area" Takeoff Item, just change the Style in the Takeoff Item Properties. However, once you use a Takeoff Item to perform (draw) takeoff, you can no longer change its Style.
|
| |
|
|
| The information in this site is protected by copyright by ConstructConnect. You may not reproduce, adapt, or publish any content from this site in whole or in part for any purpose, without the express written consent of ConstructConnect, Inc.Copyright 2025 - All Rights Reserved. |
|

 Deleting a Custom Layer from a Bid