|
|
| |
| |
06.05 Creating an Area Takeoff Item - Defining its Properties
| Last Updated: 2022-02-21 08:17 |
Area Takeoff Items describe objects such as slabs, ceiling tiles, floors, roofs, and facades, etc. - anything that typically is measured by square inches, feet, yards, meters, etc., on an orthographic projection plan. Very often, you use an Area Takeoff Item to measure volume such as the concrete required to pour slabs or poured concrete walls, gunite walls, asphalt, blown-in insulation, and landscape fill. To create an Area, select "Area" on the Takeoff Item Wizard. If you have disabled the New Takeoff Item Wizard, click the  button in the Takeoff Items Pane toolbar and a new Takeoff Item Properties dialog opens, set the Type to "Area" and you are ready to go. button in the Takeoff Items Pane toolbar and a new Takeoff Item Properties dialog opens, set the Type to "Area" and you are ready to go. You are not required to change any fields - you could click "Save" to create a Takeoff Item named "Untitled" - obviously, it is better if you fill out the Takeoff Item Properties as thoroughly as possible. At the very least, update the Name so you do not create numerous Takeoff Items named "Untitled". We recommend filling out the Takeoff Item Properties as thoroughly as possible because the Takeoff Items Pane can be grouped by some properties (Group, Layer, Tag) and others (such as Thickness, Slope, and Weight) affect calculations. The following is an example of an Area Takeoff Item an estimator might create. 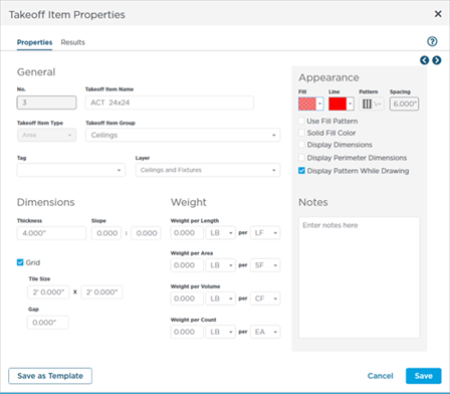
At this point, you can click Save to add the Takeoff Item to this bid, but you may want to select additional Results first (next article). You can save this Takeoff Item for future use by clicking Save as Template, we cover Takeoff Item Templates later in Related Articles. Fields in an Area Takeoff ItemMost fields in the Takeoff Item Properties are pretty straight-forward, Name, Group, Layer, etc., but there are some that may have you scratching your head. | General (Common to all Takeoff Item Types) | | Name | Whatever you want to name your Takeoff Item. It is best practice to be descriptive - for example: ACT Armstrong Style A105 - 24x24 is better than Ceiling or Area Takeoff Item 1 (a descriptive name identifies the type of object and its basic dimensions). Takeoff Item Names are used throughout the program so take the time to name your Takeoff Item accurately. | | No. | The Takeoff Item number - automatically increments to next, lowest number. Cannot be changed. | | Type | Linear, Area, Count, or Attachment (can be changed until you use this Takeoff Item to draw takeoff). | | Group | The Takeoff Item Group can be used to filter and group the Takeoff Items Pane and the Summary and Worksheet Tabs. | | Layer | See Related Articles for more information on Layers. | | Tag | Tags can be used to filter and grouping the Takeoff Items Pane much like Takeoff Item Group. In a multi-user environment, we recommend you add your name or initials as a Tag so you can filter and group the Takeoff Items Pane by Tag, and concentrate on the Takeoff Items you need. | | Appearance | | Color-Fill | Takeoff (the objects that show on the Plan) consists of two parts, the outline of the takeoff object (Line) and the Fill. | | Line | The outline of a takeoff object. | | Solid Fill Color | Sets the object to be opaque- when you drawn a takeoff object, it blocks anything behind it. If Grid is checked, as in our example, this setting is ignored because the actual grid is shown on the Plan. | | Use Pattern | Specify how the Fill looks (does it have a pattern, is it translucent, ec.). If Grid is checked, this setting is ignored because the actual grid is shown on the Plan. | | Spacing | Only visible when "Use Pattern" is checked; allows you to select the spacing of the pattern. If Grid is checked, this setting is ignored because the actual grid is shown on the Plan. | | Pattern | Only visible when "Use Pattern" is checked, allows you to select the pattern (stripes, checks, etc.). If Grid is checked, this setting is ignored because the actual grid is shown on the Plan. | | Display Dimension | When you check this option, the quantity for Result 1 displays in the center of each area takeoff object drawn, as in the examples below. 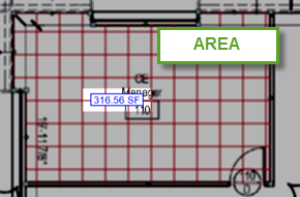
Note: you can toggle this on and off in Takeoff Item Properties if your display is becoming a bit messy with all the dimension boxes. | | Display Perimeter Dimension | When you check this option, the length of each segment of an area takeoff object is shown on the segment. The length is shown as you draw the object and when the object is complete. 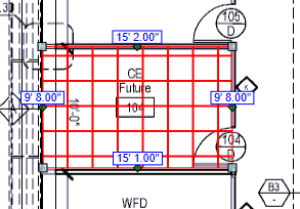
Note: This option turns on the dimensions lines at all times. If your display is becoming a bit messy with all the dimension boxes, you can uncheck this option and set the Option to "Show Segment Length" in User Settings. The program displays these segment dimensions only when an Area takeoff object is selected. | | Dimension | | Thickness | The thickness or depth of an Area object. Required if you want the program to calculate Volume (CI, CF, CY, mm3, or m3) from your takeoff (think poured concrete slabs, blown-in insulation, mulch, etc.) | | Slope/Degree | Set run and rise or degree of slope. When configured, all objects drawn with this Takeoff Item are calculated as sloped. Slope affects area results, of course, but more important, perimeter results are updated based on your selected slope and the direction of the slope. We cover drawing and adjusting Sloped Area takeoff objects in the next Chapter. | | Weight | | Weight per UOM | Allows you to specify a Weight by linear, area, cubic, or count UOM, depending on your needs. (Used with Results that include weight calculations, see next article.) | | Properties | | Grid | Used when taking off an area with a grid component. Gridded Areas are great for repeating patterns of materials, such as floor tiles, ACT ceilings, or bricks.
For our example Takeoff Item, we enabled "Grid" and set the Grid to 2'x2' (we cover using a Gridded Area Takeoff Item in Related Articles). Because we set "Grid" we would not set "Use Pattern" - the grid is what we want to see and any 'pattern' setting would be ignored. | | Tile | Specifies the size of each tile (for example, a 2'x2' (or 24x24) acoustical ceiling tile). | | Gap | Specifies the gap between each tile. Gap can affect the overall amount of tile (or other material) needed for an area considerably, especially for large areas such as conference rooms or exhibition halls. Gap also can be used to estimate the amount of labor required for grouting or other grid related materials. | | Display Pattern While Drawing | Many times, you must draw complex Area takeoff shapes, and seeing the pattern while you are drawing takeoff can be distracting. You can uncheck this option to turn off the pattern while drawing the takeoff. When you complete the takeoff, the pattern is filled-in. |
|
|
|
|
|
| The information in this site is protected by copyright by ConstructConnect. You may not reproduce, adapt, or publish any content from this site in whole or in part for any purpose, without the express written consent of ConstructConnect, Inc.Copyright 2025 - All Rights Reserved. |
|

 Linear Takeoff Item - Results