Usually, your takeoff is going to be displayed in full-color, based on each Conditions' Properties. When you are working with Page, Bid, or Typical Areas, it is helpful to be able to identify quickly if takeoff is assigned to the Selected Areas or Active Area (previous article). The product provides a way to grey-out (mute) takeoff not assigned to an Area that is not selected in the Areas drop-down. Why is some takeoff colored while other takeoff is greyed-out or muted?
On the Areas toolbar, there is a Filter button that allows you to mute (grey-out) takeoff that is not assigned to the Area(s) selected in the Areas drop-down. This button has two states:
- Unfiltered, the button is blue
 and indicates that all takeoff is colored normally.
 - Filtered, the button changes to grey
 and indicates that only takeoff that is assigned to the Area(s) currently selected in the Areas drop-down is colored. Takeoff that is not assigned to the Area(s) selected in the Areas drop-down is still visible, it is just grey-out/muted.
Using the filter, you can ensure that all takeoff gets assigned to a Bid Area - just select the "Page Area" in the drop-down and set the Toggle to grey-state. Any takeoff that is colored needs to be assigned to a Bid Area (or Typical Area, of course).
When you select multiple Areas selected in the Areas drop-down, pay attention to what is listed as the "Active Area" in the Status Bar because when you
assign takeoff or
draw takeoff, the
takeoff is assigned to that "Active Area".
There are six states possible depending on the state of the Filter button and what you select in the Areas drop-down.
Filter Off
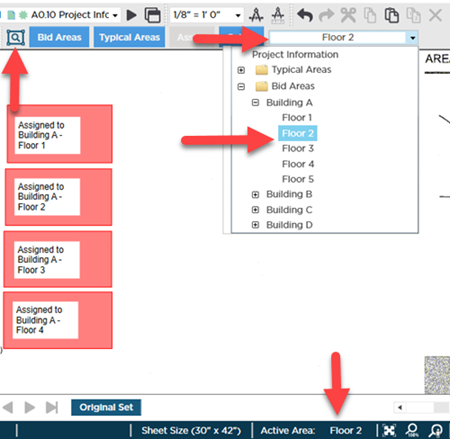
Filter Off - Single Area Selected
The button  is blue and all takeoff is colored.
This is the normal state of the Takeoff Window.
The Area shown in the drop-down label is the Active Area.
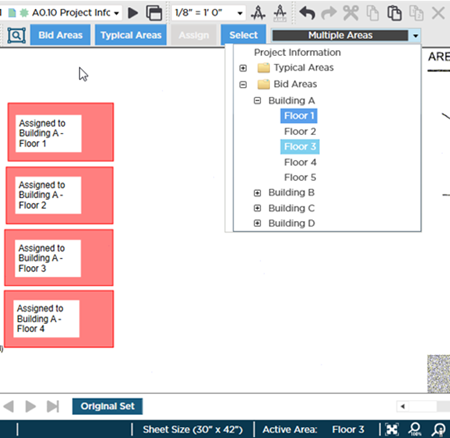
Filter Off - Multiple Areas Selected
The button  is blue and all takeoff is colored.
The only difference between this and the normal states is that because you have selected multiple Areas in the Areas drop-down, the label shows "Multiple Areas".
You must look at the Status Bar to determine the "Active Area".
Filter On
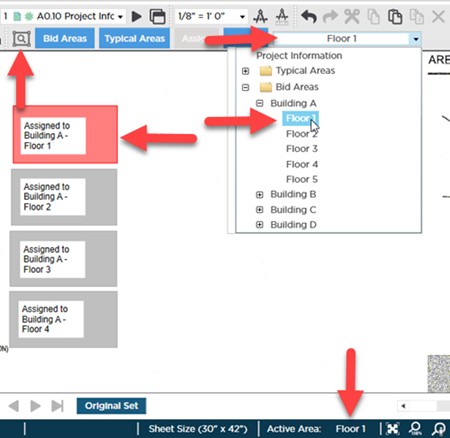
Filter On - Some Takeoff Assigned to the Selected Area (Single Area Selected)
The  button is grey and some of the takeoff is colored. Takeoff that is assigned to an Area that you have not selected will show greyed-out.
The Active Area is the same as the Areas drop-down label.
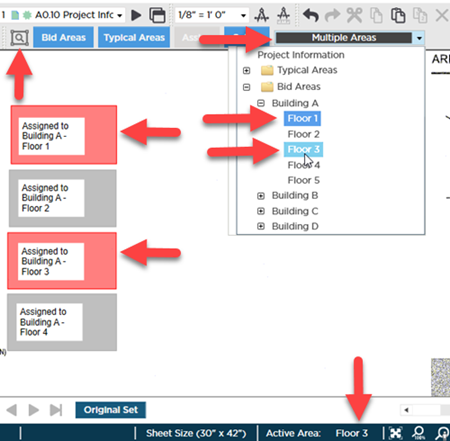
Filter On - Some Takeoff Assigned to the Selected Areas (Multiple Areas Selected)
The  button is grey and some of the takeoff is colored. Takeoff that is assigned to Areas that you have not selected will show greyed-out.
Because you have selected multiple Areas in the Areas drop-down, the label shows "Multiple Areas".
The "Active Area" (the one that has the lighter blue highlight) is the last Area you clicked on in the drop-down. Look at the Status Bar to determine the "Active Area".
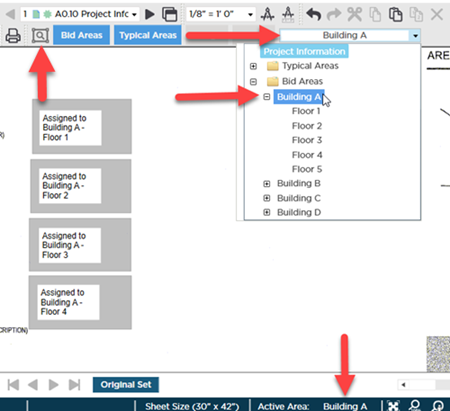
Filter On - No Takeoff in Selected Area (single Area selected)
The button  is grey. This means the Takeoff Window will only display takeoff assigned to the selected Area(s) in color.
Because no takeoff is assigned to the "Selected Area", all takeoff is greyed-out.
The selected Area is the "Active Area", so any takeoff you draw is allocated to this Area.
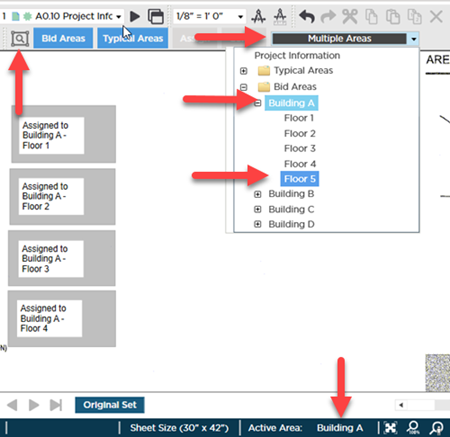
Filter On - No Takeoff in Selected Areas (multiple Areas selected)
The button  is grey. This means the Takeoff Window will only display takeoff assigned to the selected Area(s) in color.
Again, because no takeoff is assigned to the selected Areas, all takeoff is greyed-out.
Because you have selected multiple Areas in the Areas drop-down, the label shows "Multiple Areas". Look at the Status Bar to determine the "Active Area" - it is also the Area with the lighter blue highlight in the drop-down.
If you want to see all the takeoff in color, just toggle off the Filter so it turns blue  .
.

 and indicates that all takeoff is colored normally.
 and indicates that only takeoff that is assigned to the Area(s) currently selected in the Areas drop-down is colored. Takeoff that is not assigned to the Area(s) selected in the Areas drop-down is still visible, it is just grey-out/muted.


 Selected Areas and the Active Area