A Typical Group Marker is a link back to the takeoff within the Typical Group Frame. Hmmmm, that does not really make sense. Let's try to explain it a bit better...
When you place a Marker on the Plan, it tells the program to display a "shadow" of the takeoff that defines the Typical Group (the takeoff that is within the Typical Group Frame) and show it wherever you place a Marker. The real takeoff is inside the Typical Group Frame - only a reference to that typical takeoff it shown at the Marker. If you do not want to see the takeoff at the Marker, you can right click on the Typical Group in the Typical Groups Pane and select "Hide Takeoff at Marker...". This has no effect on calculations, only what you see on the screen and printouts.
Once placed, you can move/align the Marker and the associated takeoff but only as a group - you cannot select an individual piece of takeoff at a Marker - the group functions as one. To modify takeoff shown with a Typical Group Marker, you must go back to the Typical Group Frame and make your edits. Because you are then editing the takeoff that defines the Typical Group, those changes affect ever Marker placed, on any Page, in this Bid.
To quickly return to the
Typical Group Frame, double click on any
Typical Group Marker.
The visual alignment and size of the takeoff shown at a Marker is defined by the takeoff contained with the Typical Group Frame, not the size or shape of the Frame itself. If you change the takeoff within the Frame, all the Typical Group Markers remain in the position where you placed them, which may cause the takeoff associated with the Markers to no longer align to the Plans. For this reason, we recommend you ensure that the takeoff inside the Typical Group Frame is correct and complete before you place or align any Typical Group Markers.
Placing Typical Group Markers
Placing a Typical Group Marker is very similar to drawing Count takeoff (see Related articles, for a refresher).
First, navigate to the Page where the Markers are required. This is not the "details" Page where we drew the takeoff inside the Typical Group Frames, this is the floor plan Page(s) where the units must be accounted for. (Remember, our example is a high-rise condo complex, floors 1, 2, and 3 are unique, floors 4-22 are the same.)
Select a Typical Group from the Typical Groups Pane (if you have not already drawn the Typical Group Frame, you will be prompted to do so - see Related articles, for a refresher on the Typical Group Pane).
Click once in the Takeoff window wherever this Typical Takeoff occurs - a Typical Group Marker appears.
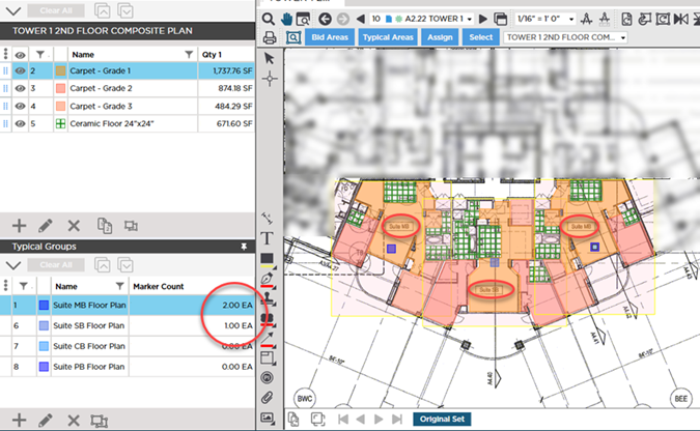
We placed 2 "Suite MB Floor Plan" and 1 "Suite SB Floor Plan" Markers on this plan (you can see the faint outline for the box that represents the Frame in yellow). For the suite on the right, we had to flip the takeoff to match the Plan, we cover selecting and editing takeoff in the Chapter 11, see Selecting Objects (Selecting Takeoff or Annotation) for more information.
Let that sink in for a moment. In just three clicks we took off an entire floor of
takeoff. And, because we are not drawing this
takeoff one piece at a time, if we have to make a change, for example, perhaps we took off (drew) the ceramic floor with a 24x24 gridded
Takeoff Item, but an updated
Plan calls for 12x12 tile. Making this change is and updating every instance of this
takeoff, throughout our
bid, is as simple as going back to the
Typical Group Frame and modifying that
takeoff once.
We continue placing your Typical Group Markers on the the Pages for Floors 2 and 3. Even though we need to use Typical Areas to account for all the takeoff on the typical Page for Floors 4 - 22, we need to take it off once now, so we will do that also.
Remember, by default, the takeoff associated with the Typical Group is displayed along with the Marker itself. You can see the Markers in the screenshot above, they are the large bluish squares at the center of each group of typical takeoff. Seeing the takeoff may not be desirable and you can hide to make taking off the rest of the Page easier. There is still a lot of takeoff to draw manually on this Page, after all. Hiding the Typical takeoff has no effect on calculations - just what is shown on this screen. To hide the Typical takeoff, right-click on the Typical Group in the Typical Groups Pane and choose "Hide Takeoff at Marker". This only affects the selected Typical Group - you hide each Typical Group's takeoff independently. You can also show or hide the Layers to which the Takeoff Items used to draw the original, typical takeoff are Assigned, or the Takeoff Item Layers. See Related Articles for details.
Typical Group Counts and Takeoff Item Quantities
Each time a Marker is placed:
- The selected Typical Group's "Marker Count" quantity increases by 1 in the Typical Groups Pane.
- The individual Typical Group's Takeoff Items' Results increase in the Takeoff Items Pane (on the Page on which you place a Marker).
- Cumulative Results (totals) for Takeoff Items and the Typical Group increase on the Summary and Worksheet Tabs.
If you want to make changes to the takeoff associated with a Typical Group, you return to the Typical Group Frame and edit the takeoff inside/touching the Frame - everywhere a Marker is placed updates automatically.
Typical Group Markers Placement Rules
- You can place a Typical Group Marker on top of other Markers from the same or other Typical Groups as well as on top of other manual takeoff.
- You cannot place a Typical Group Marker inside a Typical Group Frame.
- Takeoff associated with a Typical Group Marker can intersect a Typical Group Frame, but only the takeoff - not the Marker. This virtual takeoff is ignored my the Typical Group Frame it intersects.
- If a Marker is placed close to the edge of the Sheet, the takeoff still appears, but may be cut-off at the edge of the Sheet. That's fine; as long as the actual Marker fits on the Sheet, it is placed regardless of whether the associated takeoff objects can be displayed.
- Takeoff from multiple Markers from the same or different Typical Groups can overlap other Markers. This takeoff can also overlap Typical Group Frames. It is only when the actual Marker itself is touching or within the Frame that the warning notification is generated.

 Resizing, Moving, And Deleting Typical Group Frames