We assume you added an initial (Original) Plan Set to your project when you created it, see Related articles if you need a refresher on adding the initial Plan Set.
As you work a project, you may be provided "revision" sets of plans - plans that update previously issued project files. This article covers how to add that Plan Set, and the next article covers the critical step of matching those revisions.
Over the course of a project, you may receive additional, updated Plan Sets, often more complete/finalized, that may include changes from the initial set or may be options to the initial Plan Set. These "revisions" to a Plan are related to the Original Plan, so you'll want to organize them accordingly. Below, we walk you through adding additional Plan Sets so we can demonstrate how you match updated drawings (Revisions) to early versions of drawings.
On the Project and Bids List, expand the Project to which you want to add a Plan Set
Click on the  button for the Bid to which you want to add the Plan Set. The Plan Organizer opens (we made the Plan Organizer wider so we could see all the columns).
As a reminder, any
Plan Set you add to any
Bid in a
Project is
available to every other
Bid in the
Project, but it does not necessarily have to be
active in every
Bid in the
Project. See Related Articles for more information how all the Bids in a
Project share the same
Plan Sets.
The Plan Organizer opens in "locked" mode, click the  button in the lower-right corner to unlock it.
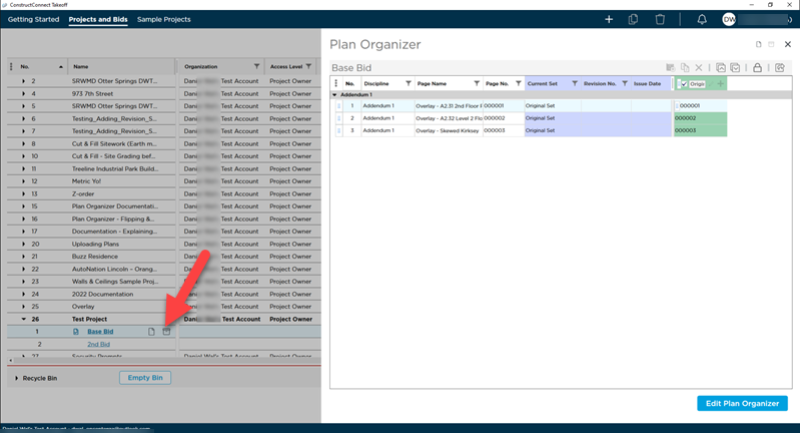
As you can see, there is only one Plan Set in this project. Remember, all bids under a project share access to the same Plan Sets although every Plan Set does not need to be "active" in each bid. This is why the Plan Organizer button is associated with the bids, not the project - because when you add a Plan Set, it automatically is activated for the bid from which you opened the Plan Organizer, but not for other bids in the project.
Click the Add Set button  in the toolbar at the top of the Plan Organizer.
In the Plan Set Editor screen, click the Select Folder button (the program displays a prompt pointing to the button), the Browse for Folder dialog box opens.
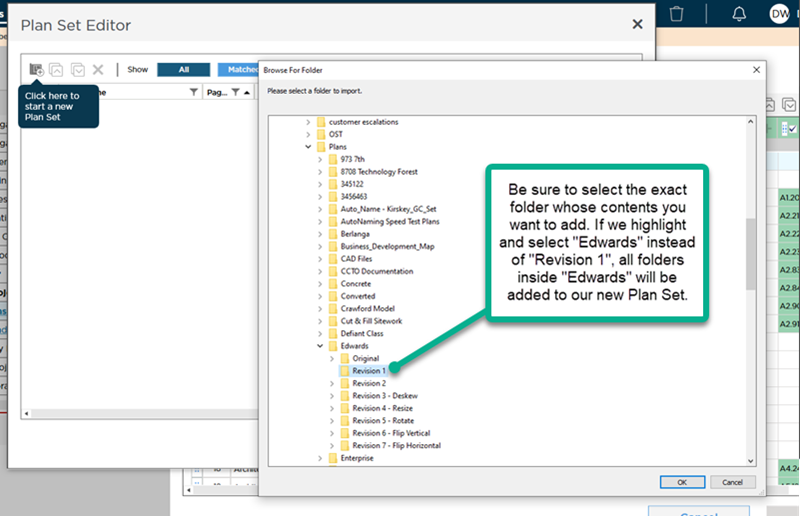
Browse to where your Addendum files are located - be sure to select the folder whose entire contents you want to add.
The program imports the addendum plans - in our example, there are only two plans in this Set.
When you add
Revision Sets, you need to rotate them to match the existing Plans. Once a
Plan Set is saved, you can rotate the entire
Page on the
Takeoff Tab, which includes all the
takeoff and
annotation on the
Page in 90 increments° , and you can rotate the
Plan (the underlying drawing) 180° or flip it - you cannot adjust a
Plan's orientation after it is saved.
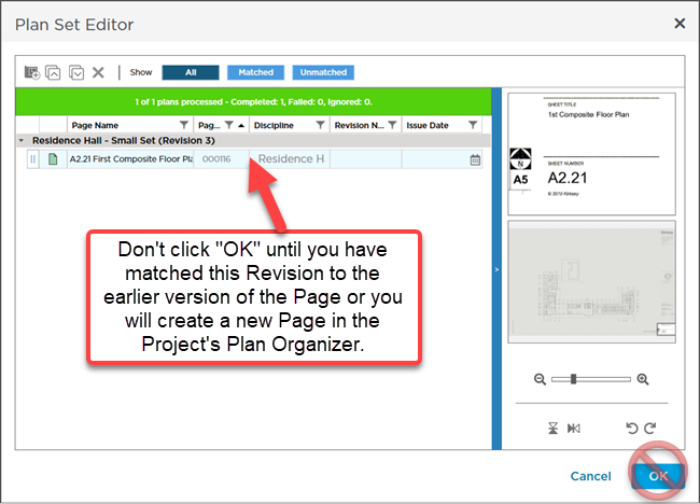
 Do not click OK! You need to match these Plans to their existing, previous versions or the program will create new Pages for them.
Because both plans in our new Plan Set are revisions of existing plans in our project, we do not have to update their names or Sheet Numbers. If we were creating new Pages, we would want to do that. See Related Articles for details on why it is important to name your Pages properly.

 Editing an Existing Plan Set