In Using Overlay to Identify Changes Between Revisions (of the Same Plan), we show you how to compare revisions of the same Plan to each other. Sometimes, you may need to compare two plans that are not revisions of each other. This can help you identify construction collisions and conflicts - construction objects or work that interferes with other work.
Also called "Construction Coordination comparisons" and "Collision Detection" Overlays, these comparisons allow you to select any other Plan in your current bid to compare to the current Page. Our goal is to identify if any building components will overlap (perhaps some HVAC component is supposed to be in the middle of a wall according to the plans), or to identify where construction labor may interfere with other trades.
Below, we compare an Electrical plan with a Mechanical plan, to see if there is anything with which we need to be concerned.
First, we navigate to an Electrical Plan - this becomes our "Base Image".
Next, if it is not already open, click on the Overlay Pane in the right-side dockbar. (It is easier to use non-revision Overlays if you pin this dockbar open - see Related Articles for details).
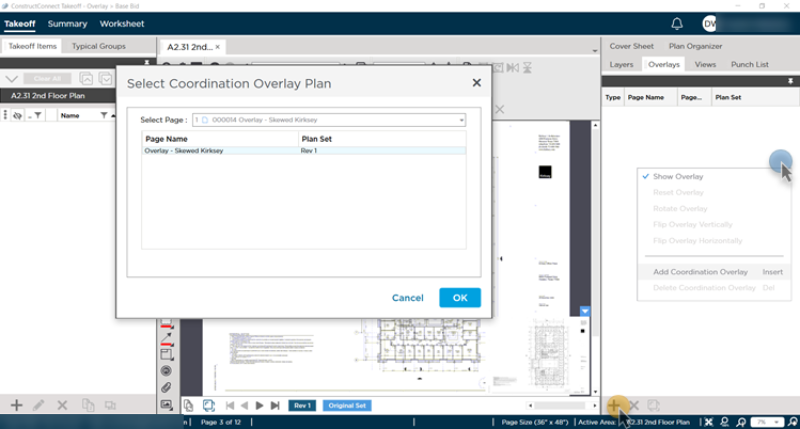
To add the Coordination Overlay,
- Click the
 button in the toolbar at the bottom of the Overlay Pane, or
 - Right-click within the Pane and select "Add Coordination Overlay", or
- Click in the Pane and press <Insert> on your keyboard).
The Select Coordination Overlay Plan dialog box opens.

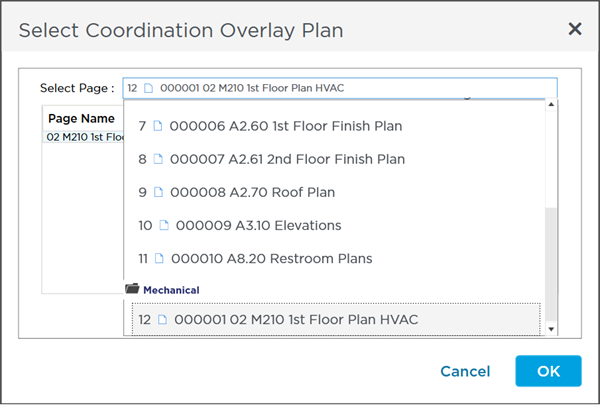
Click the drop-down next to Select Page

From this drop-down, select the Page to which you want to compare the current Plan - in our example, we are going to choose a "Mechanical" Plan because we want to make sure that no HVAC systems will affect construction of the walls/ceilings. Your Coordination Overlay Plan must already exist in an Active Set within this Bid, if it doesn't, open the Plan Organizer and add it.
Click OK (If you have not turned on the Overlay function already, the program asks you if you want to turn it on, do so).
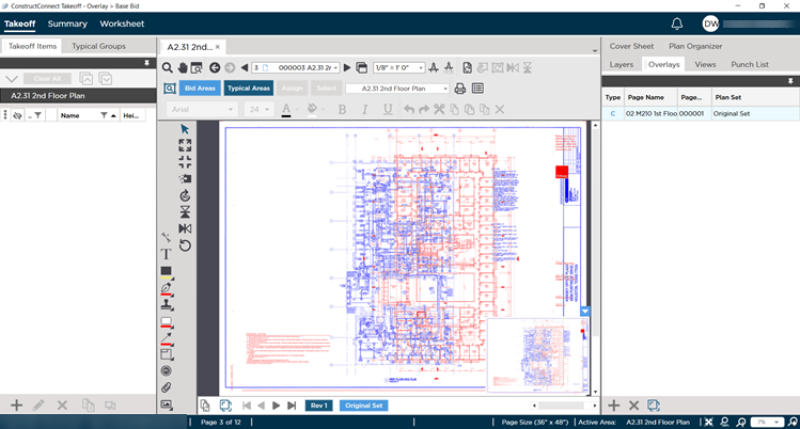
You see something resembling the screen below...

Yes, this looks a bit chaotic, for two reasons:
- We have not aligned or adjusted the size of the overlay to match the base Plan - they are slightly different sizes and at slightly different positions on the Page so nothing matches.
- Because we are comparing two plans that are not in the same trade, there are going to be a lot of differences. The program shows you every difference between the two Plans. Because they are not revisions of the same Plan where you would see minor, incremental changes, there are a lot of differences (a lot of blue and a lot of red).
After we align and adjust the overlay, some of that red and blue will change to greyish purple (the walls, for example, that are the same from plan to plan), and we should be able to identify potential construction collisions, before we get to far along in our estimate or worse, are at the construction site!.
Remember, the "base image" is the Page shown in the Takeoff Window's Page Navigator (the Page you are "on") and is shown in red. The overlay is the Page you added as a Coordination Overlay and is shown in Blue.
You can add a number of Coordination Overlays to a Page, but you can only compare one at a time to the base image. If you want to compare a Coordination Overlay to another Coordination Overlay, navigate to that Page and add the 2nd as a Coordination Overlay.
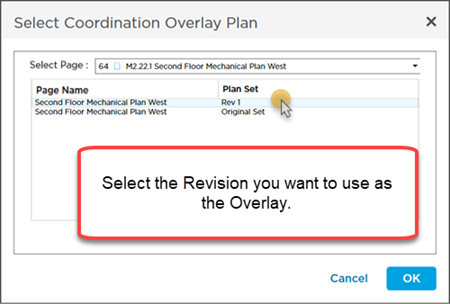
Revisions of a Coordination Overlay Plan
If the Page you choose as a Coordination Overlay includes multiple Revisions, you can select which revision you want to use after selecting the Page.

After you select a revision to use, you can add this Coordination Overlay again to select another - so you can compare any number of revisions of an Overlay Page to each Revision of the base Page.
In the next few articles, we show you how to adjust your overlay to minimize the red and blue highlighting so you can focus on the true changes or differences between the two Plans.

 button in the toolbar at the bottom of the Overlay Pane, or


 Using Overlays to Identify Changes Between Revisions