ConstructConnect Takeoff supports exporting the Worksheet Tab to Microsoft Excel (this article) and Quick Bid (the next article).
The Worksheet Tab exports directly into an Excel workbook, only a full-version, locally-installed copy of Microsoft Excel is supported, see System Requirements for details.
Exporting to Excel
When you export the Worksheet Tab to Excel, the program pushes the information directly into an Excel spreadsheet. You do not have to create an Excel file before exporting but if you do, it might look something like the one below. Just make sure there is a clear spot where ConstructConnect Takeoff can insert information.
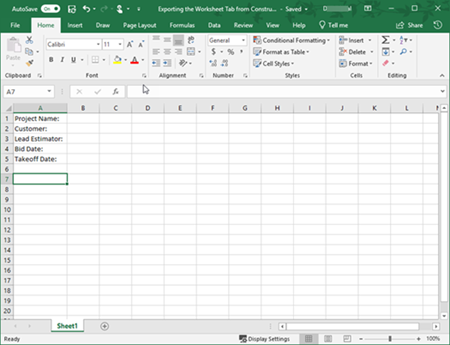
Now, return to ConstructConnect Takeoff and prepare the Worksheet Tab - whatever filters and groupings you apply to the the Worksheet Tab is how the Tab is exported.
Click the Export to Excel button  located in the toolbar, the Export dialog box opens.
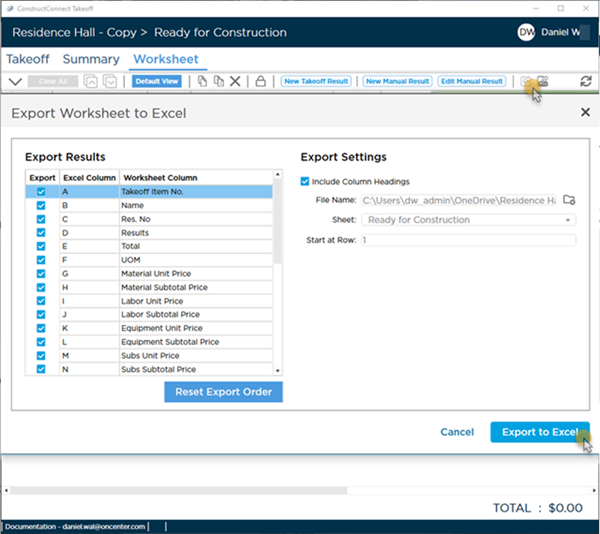
In the Results section (the left side of the dialog box), you select which columns you want to export. Even optional columns currently not being shown on the Worksheet Tab can be exported (see Related Articles for more information on showing and hiding columns).
Next, in the Export Settings section (the right side of the dialog box), change the File Name, Sheet, and Start at Row values to indicate precisely where you want your data inserted in the spreadsheet.
First, select the File or instruct ConstructConnect Takeoff to create a new one.
- By default, the program creates the Excel file in your Windows "Documents" folder, named for the bid. You can customize this name, however you like.
- If you want to select an existing file, click the lookup button next to the File Name field and browse to the appropriate location. Select the Excel file to which you want to export your bid data and and click Save - you are prompted to confirm that you want to replace it - existing data, starting at the row you indicate in Options, is going to be overwritten if you continue.

You are prompted to overwrite information every time you export the Worksheet Tab - as a reminder for you to double-check where you are exporting information so you do not inadvertently overwrite information.
If there is more than one sheet in your workbook, you need to instruct the program which Sheet to export.
Lastly, you need to tell the program at what row in the Excel spreadsheet to start inserting information. In our example, we want the data to start at Row 7 in Excel. (We use the first six rows in our spreadsheet for project or bid details.)
Click the  button and the Worksheet Tab is exported to the selected Excel file.

When the export finished, click the  button in the message. Excel launches with your spreadsheet updated.
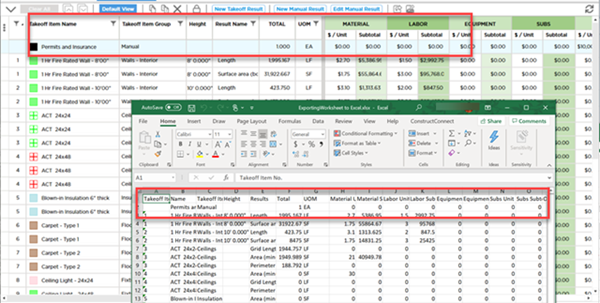
Notice that the export did not change Rows 1 - 7 in the spreadsheet because we told it to start at Row 7.
Open File Warning
If you try to export to an Excel file that is in use (open), you will receive an error...
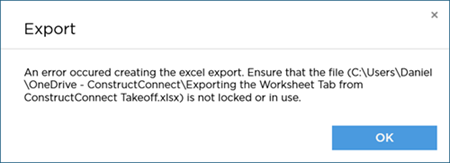
ConstructConnect Takeoff cannot update a file that is open in Excel. Close the file and try again.
Data Below Export Range
If you export the Worksheet Tab to an Excel spreadsheet that has more rows than the Worksheet Tab, only those rows that exist on the Worksheet Tab will be overwritten in the Excel file. In our example, there is data in the rows below our exported data. This data will not be overwritten if we export the Worksheet Tab again - unless we do something that adds rows to the Worksheet Tab such as grouping or adding Results. Only the rows highlighted in the screenshot below would be updated, the Month rows would not be overwritten.
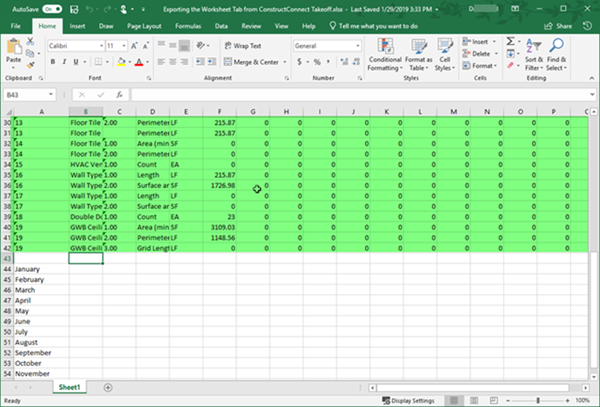
The export only overwrites rows required by the Worksheet Tab.
Remember, what you see on the Worksheet Tab is what gets exported to Excel, groups, filters, and pricing is all exported exactly as shown in the program.
If you use On Center's Quick Bid® Professional Estimating software, see the next article for information on creating a project file you can import into Quick Bid.


 located in the toolbar, the Export dialog box opens.

 button and the Worksheet Tab is exported to the selected Excel file.
 button in the message. Excel launches with your spreadsheet updated.


 Adding and Removing Manual Results on Worksheet Tab