|
|
| |
| |
06.04 Creating a Linear Takeoff Item - Defining its Properties
| Last Updated: 2022-02-18 13:00 |
Linear Takeoff Items describe objects such as walls, foundations, curbs, piping, wiring, or framing, etc. - anything that typically you measure by linear foot, inches, meters, etc., on an orthographic projection plan.
To create a Linear, select "Linear" in the New Takeoff Item Wizard. If you have disabled the New Takeoff Item Wizard, click the  button in the Takeoff Items Pane toolbar and a new Takeoff Item Properties dialog opens, ready for you to customize. button in the Takeoff Items Pane toolbar and a new Takeoff Item Properties dialog opens, ready for you to customize.
You are not required to change any fields - you could click "Save" to create a Takeoff Item named "Untitled" - obviously, it is better if you fill out the Takeoff Item Properties as thoroughly as possible. At the very least, update the Name so you do not create numerous Takeoff Items named "Untitled". We recommend filling out the Takeoff Item Properties as thoroughly as possible because the Takeoff Items Pane can be grouped by some properties (Group, Layer, Tag) and others (such as Height, Width, Slope, Rounding, and Weight, etc.) affect calculations.
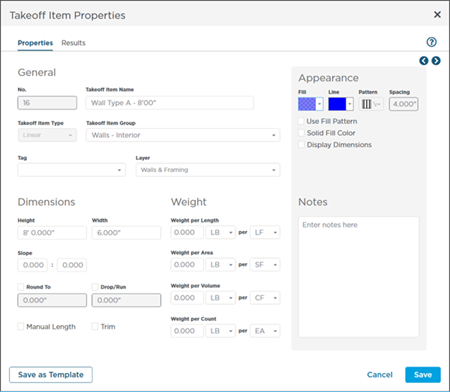
The following is an example of a Linear Takeoff Item an estimator might create.
At this point, you can click Save to add the Takeoff Item to this bid, but you may want to select additional Results first (next article).
You can save this Takeoff Item for future use by clicking Save as Template, we cover Takeoff Item Templates later in Related Articles.
Fields in a Linear Takeoff Item
Most fields in the Takeoff Item Properties are pretty straight-forward, Name, Group, Layer, etc., but there are some that may have you scratching your head.
|
General (Common to all Takeoff Item Types) |
|
Name |
Whatever you want to name your Takeoff Item. It is best practice to be descriptive - for example: Wall Type A - 8'00" is better than Wall or Linear (a descriptive name identifies the type of object and its basic dimensions, such as Height). Takeoff Item Names are used throughout the program so take the time to name your Takeoff Item accurately. |
|
No. |
The Takeoff Item number - automatically increments to next, lowest number. Cannot be changed. |
|
Type |
Linear, Area, Count, or Attachment (can be changed until you use this Takeoff Item to draw takeoff). |
|
Group |
The Takeoff Item Group can be used to filter and group the Takeoff Items Pane and on the Summary and Worksheet Tabs. |
|
Layer |
See previous articles for more information on Layers. |
|
Tag |
Tags can be used to filter and grouping the Takeoff Items Pane much like Takeoff Item Group. In a multi-user environment, we recommend you add your name or initials as a Tag so you can filter and group the Takeoff Items Pane by Tag, and concentrate on the Takeoff Items you need. |
|
Appearance |
|
Color-Fill |
Takeoff (the objects that show on the Plan) consists of two parts, the outline of the takeoff object (Line) (yes, even on a linear) and the Fill. When creating a Linear, the Fill is usually visible only for wide linears or when zoomed in. |
|
Line |
The outline of a takeoff object. |
|
Solid Fill Color |
Sets the object to be opaque - when you drawn a takeoff object, it blocks anything behind it. |
|
Use Pattern |
When taking off wide linear objects, you can specify how the Fill looks (does it have a pattern, is it translucent, etc.). (Even lines can have a pattern - especially thick lines or when you are zoomed in.) |
|
Spacing |
Only visible when "Use Pattern" is checked; allows you to select the spacing of the pattern. |
|
Pattern |
Only visible when "Use Pattern" is checked, allows you to select the pattern (stripes, checks, etc.). |
|
Display Dimension |
When you check this option, the segment's length displays on each segment of takeoff drawn, as in the examples below.
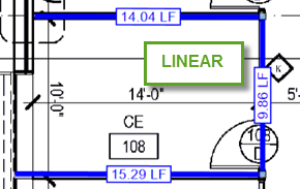
Note: you can toggle this on and off in Takeoff Item Properties if your display is becoming a bit messy with all the dimension boxes.
|
|
Dimension |
|
Height |
The Height of the Linear object - especially important if you want the program to calculate square footage off your linear takeoff. |
|
Width |
Specifying a Width allows the program to calculate VOLUME and affects how the takeoff looks on screen. |
|
Slope/Degree |
Set run and rise or degree of slope. |
|
Weight |
|
Weight per UOM |
Allows you to specify a Weight by linear, area, cubic, or count UOM, depending on your needs. (Used with Results that include weight calculations, see next article.) |
|
Measurement |
|
Round |
The program rounds each segment to the nearest specified increment (not the overall, cumulative Results). |
|
Round To |
Only active when "Round" is selected, you specify the increment to which each linear segment is rounded. |
|
Manual Length |
If you click this option, each segment you draw includes a small number value box you use to enter the known length. When using Manual Length, two segments can be the same visual length on the screen and account for different lengths in the cumulative totals for the Takeoff Item. Manual Length segments are not to scale. |
|
Drop/Run |
Every segments includes a small number value box where you can enter a 'drop/run' length that is added to the segment's length. Useful for electrical and plumbing where you have to account for a vertical run for many or all segments. |
|
Add Length |
Only active when "Drop/Run" is selected, you specify a predefined drop/run value that is added to each linear segment. If you leave this box blank, a drop/run box is added to each takeoff object but there is no drop/run value entered - you enter a value for drop-run anytime it is required. |
|
Properties |
|
Trim |
When you are drawing linear takeoff, you may not want a segment to continue past existing linear segments. If you select this option, when you draw a segment and it hits an existing linear segment, the takeoff ends at the intersection, regardless of how far past you draw the new linear segment. |
Slope Calculations
Slope is often calculated different ways by different disciplines and divisions. ConstructConnect Takeoff uses standard MATH functions to calculate slope whether you enter Rise:Run or Degrees.
Slope is calculated as (length*(srqt(SQR(rise)+SQR(run))))/run
Degree is calculated as ATAN(rise/run)*(180/PI())
Order of Calculation (Linears)
Because the order in which options are calculated matters, it is important to remember that the program calculates options in this order:
- Slope (your Slope calculation is done first)
- Round (segments are then rounded to whatever interval you configure)
- Drop/Run (the drop/run is applied)
|
|
|
|
|
| The information in this site is protected by copyright by ConstructConnect. You may not reproduce, adapt, or publish any content from this site in whole or in part for any purpose, without the express written consent of ConstructConnect, Inc.Copyright 2025 - All Rights Reserved. |
|

 Setting Takeoff Item Group, Layer, and Tag