| |
| |
07.07 Drawing Attachments Takeoff (Overview)
| Last Updated: 2022-02-23 07:05 |
Attachments account for objects on a plan such as windows, doors, or lightboxes (in a suspended ceiling), that are bound to a Parent (a door, for example, is bound or attached to a wall, a lightbox is attached to the ceiling in which it is installed). Counts (detailed in the previous article) and Attachments are different Takeoff Item Types, however you draw them (place a Count or Attachment on your plan) in much the same way. The difference between Counts and Attachments is Counts can be placed anywhere and Attachments must be placed on or within a Parent takeoff object.
Counts versus Attachments
The biggest difference between drawing Counts (previous article) and Attachment takeoff is where an Attachment can be placed:
- You can drop a Count object anywhere on your plan, its placement is not dependent on any other takeoff.
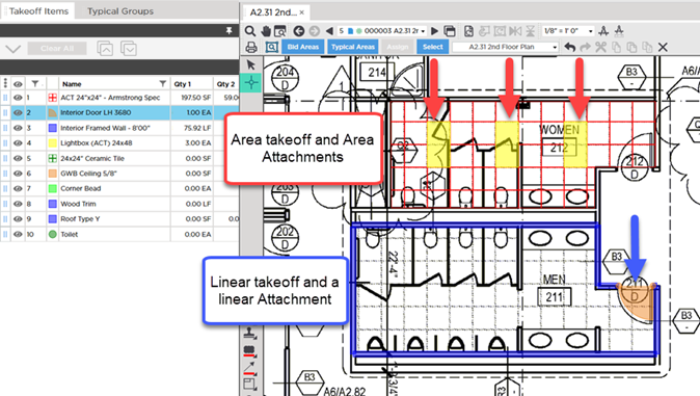
- Attachment takeoff, however, must be placed on a "parent" takeoff object. There are two types of Attachment Takeoff Items, those that can be attached to an Area takeoff object (such as a circle, square, rectangle, or triangle), and openings that get attached to Linear takeoff objects (such as doors and windows). Both are detailed in the next two articles.
- You cannot place an Attachment that is wider (longer) than its parent on that parent object - the Attachment must "Fit" within the length of its parent object. For example, you cannot place a window or door that is 48" wide on a piece of Linear takeoff that is only 45" long...the Attachment just does not fit! however... (This can be a bit confusing because we are using "width" for the Attachment and "length" for the parent object. If you consider the real world application, it makes sense. If you were building a wall and it was only 45 inches long (the parent objects length as taken off on the plan), you would not be able to insert a window into it that was 48" (the Attachment's "width" dimension) - the window is too wide.)
- You can place an Attachment that is taller (has a greater Height) than its parent object. For example, you can place an 80" tall door on a 48" tall linear object - the object fits within the length of the takeoff object, even though it is taller. (Again, this may be somewhat confusing, but think back to that wall we are building. If the wall is at least as wide as the opening, there is something to attach a window or door two. The assumption is that there is something above the point of the wall's "Height" (such as some other type of wall). This is not the same case as an object that is too wide for its parent.)
Drawing Attachment Takeoff
When you select an Attachment Takeoff Item, the Attachment Takeoff Tool ( ) becomes active (there is only one tool because there are no options for taking off Attachments). ) becomes active (there is only one tool because there are no options for taking off Attachments).
- Click the
 button button - Depending on the type of Attachment you select (linear or area, detailed in the articles that follow), you can place the Attachments on the appropriate parent objects. In our example below, we have taken off the ceiling in one restroom and the walls in the other. The Attachment Takeoff Item's shape dictates the Type of parent (Linear or Area) to which we can attach this object.

There is only one way to takeoff an Attachment, by placing the object on an existing takeoff object.
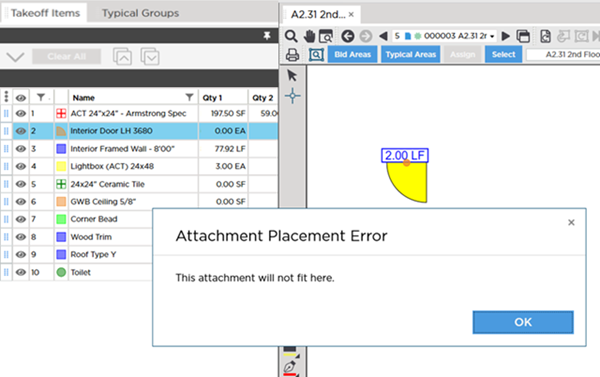
If you attempt to place an Attachment on a parent on which the Attachment does not fit (in our case, we are trying to place a door that is 36" wide on a wall that is only 24" long), the program displays an error.

Before drawing any takeoff, you must set and verify Scale, see Related Articles. Even though, like Counts, Attachments have "set" Dimensions, defined in the Takeoff Item's Properties they are attaching to Linear or Area objects that are depending on Page Scale to calculate Results accuracy, so get in the habit of always setting and verifying Scale before drawing any takeoff.
|
|
|
|

 ) becomes active (there is only one tool because there are no options for taking off Attachments).

 Drawing Count Takeoff