In the previous Chapter, we touched on the definitions of Takeoff Items and Takeoff, in this Chapter, we are going to detail how to create Takeoff Items, Layers, and Bid Areas to prepare for measuring your plans. This is why you are using ConstructConnect Takeoff - quantifying your building components so you can create a Cost Estimate.
At the end of this Chapter, you should be able to create Takeoff Items and modify Takeoff Item Properties to account for a variety of building objects and produce Results that are meaningful to you.
You also should understand how Layers affect what you see on the screen and how to save Takeoff Items as Templates for later use.
Takeoff Items
A Takeoff Item is a representation of some object, such as a floor, wall, footing, door, window, etc., you want to measure. Some estimators call Takeoff Items "objects" or "assemblies" (or, in previous versions, we used the term "Conditions") but in ConstructConnect Takeoff, we use "Takeoff Item" to describe an object that is being measured. You use Takeoff Items when you draw takeoff - all the takeoff you draw with a Takeoff Item accumulates to provide you with an total amount of whatever you are measuring. A Takeoff Item contains information about a particular object including its Name, Dimensions (wall height, for example), Layer, and what Results you want the program to calculate for you.
There are four basic Types of Takeoff Items: Linear, Area, Count, and Attachment. We detail each of these Takeoff Item Types in the articles that follow. Think of Type as how you would measure something on a plan. For example, if you are looking at a floor plan (an Orthographic image), and you wanted to quantify the walls, you would probably use a Linear Takeoff Item because you would take linear measurements. If you were taking off a horizontal surface, such as a floor or ceiling, you would use an Area Takeoff Item. But, just because you are drawing a Linear Takeoff Item does not mean that the program is restricted to calculating just length. Because you typically supply Height and Width, the program can take that linear takeoff and calculate area and volume - the program can even calculate how many segments you have drawn, if you like. If you cannot find a Result that suits your needs, you can write your own, custom Formulas (this is very advanced stuff, covered much later in this User Guide, for now, let's stick with simpler takeoff and results).
Each unique building object on a plan must coincide with a separate Takeoff Item, however you use the same Takeoff Item to measure the same build object throughout your bid (you only have to create a Takeoff Item once within a bid, you re-use it).
As an example, let's say you were going to take off a few different types of walls on a floor plan. To quantify the various walls in a project, you create a Takeoff Item for each unique type of wall such as "8'00" 1 Hour Fire Rated", "Exterior Wall", "10' Demising 2 Hr Wall", etc. Each change in Height or how an object is built (wood framing, metal framing, CMU, etc.) requires a separate Takeoff Item. If you are taking off a multi-story building and floors 1-4 are 8' high but the 5th floor is 10' high, you would need two interior wall Takeoff Item, one set up to measure the 8' high walls, the other for 10' high walls. But remember, you would not need different Takeoff Item to measure the walls on floors 1, 2, 3, and 4 - you would use the same 8' High wall Takeoff Item and the program would keep track of where it was used.
A
Takeoff Item for a specific object needs to be created only
once because you re-use the same
Takeoff Item on any
Page in a
bid where the object exists. You also can copy
Takeoff Items from one
bid to another and save
Takeoff Items as
Takeoff Item Templates to be used in future projects. One of the fastest ways of creating a
Takeoff Item is by
duplicating an existing one - then all you need to do is modify whatever properties are different (height, width, color,
layer, etc.). We cover all these options in this Chapter, first, you have to understand what a
Takeoff Item is and how to create one before you can start copying or duplicating.
The Takeoff Item Pane is where every Takeoff Item in the current bid is created and managed. Because the Takeoff Items Pane can be grouped by Takeoff Item Group, Layer, or Tag, we recommend that you fill in as many details as possible for your Takeoff Items when creating them. We are going to talk more about Layers in the articles that follow. Even though each Takeoff Item is on its own, unique Takeoff Item Layer, it is beneficial to assign similar Takeoff Items to the same Layer so you can show or hide like takeoff objects quickly (you could hide/turn off all "Walls" or all "Floors" quickly, and then turn them all back on again just as quickly).
If you ever have questions about how to set up a specific Takeoff Item to measure something, please contact click "How do I...?" in the Help Menu to ask our Training team - we are happy to help you.
Let us look at a very simple blueprint.
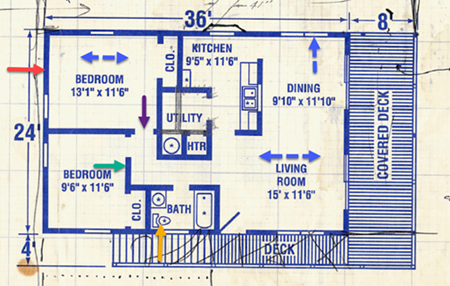
The colored arrows are pointing to building objects you may want measure - each of these would be represented by a Takeoff Item . If you were a framer, for example, you would create a Takeoff Item for the exterior walls and a separate Takeoff Item for the interior walls. If you installed flooring, you need a separate Takeoff Item for each type of floor (assuming you have tile in some areas and carpet in others, for example). For finish carpenters, each unique window or door size needs to be represented by its own Takeoff Item, etc.
There are a few reasons (these are examples only):
- Different height walls may be priced differently and usually require different labor.
- Interior and exterior walls probably are not the same materials or of the same construction.
- Different floors or ceilings probably have different costs and materials associated with them.
- Attachments can subtract or add to their "parent" objects.
If you do not setup your Takeoff Item correctly, the program cannot give you the most accurate Results possible. Usually, an estimator takes the quantities generated by drawing takeoff (measuring your plans) and does something with them. Taking the time to account for unique building objects properly means you have accurate takeoff quantities to price.
In general, anything that makes a building object "unique" probably requires a separate Takeoff Item. Sometimes, if the difference is only a matter of finish, such as a door that's painted white or black, but the cost, material, and labor are the same, you can use the same Takeoff Item, it all depends on how you account for these variances in your Estimate.
Layers
Layers store various visual components on the Takeoff Tab such as the image or plan, annotations such as text or highlighting, and of course, takeoff you've drawn.
We cover Layers in detail in the next article.
Takeoff
We cover drawing takeoff (using Takeoff Items to measure building objects) in detail in the next Chapter.
Briefly:
- Takeoff is the visible representation of measurements you draw using Takeoff Items. You draw takeoff in the Takeoff Window on the Takeoff Tab (we like the word "Takeoff").
- Takeoff exists on the Layer to which its Takeoff Item is assigned (we cover Layers in the articles that follow). As mentioned above, each Takeoff Item also includes a toggle to show/hide takeoff drawn with it.
- You can assign takeoff to Bid Areas, Typical Groups, and Typical Areas to make measuring building objects and analyzing your takeoff Results easy.
- You can copy, paste, rotate, duplicate, resize, and delete takeoff after you have drawn it. We cover that in the next Chapter.
- As you draw takeoff, the Takeoff Items' quantities update on in the Takeoff Items Pane for the current Page and on the Summary Tab and Worksheet Tab (Chapter 13), where you see cumulative results. On the Summary and Worksheet Tabs, you can analyze and price those cumulative results to get a rough unit cost for your bid.
- You can export takeoff totals to Excel or export the project to Quick Bid for additional estimating activities.
- Before you take a single measurement, you must set and verify the scale on the Page! Every Page, before you draw one piece of takeoff, no exceptions - do not trust the scale on drawing, it may not be accurate, test for yourself to avoid errors. See Related Articles for details.
- Our motto is, "If it is Colored, it is Counted" - when you are reviewing your bid, when you look at a Plan, if a building object has colored takeoff drawn on it, it is counted in your Results. How about that for eliminating missed takeoff quantity?
In the articles that follow, we are going to cover creating each Type of Takeoff Item (Linear, Area, Count, Attachment) and in the next Chapter, using those Takeoff Items to draw takeoff on (measure) your Plans.
Let's start by creating Layers - they are one of the few records that cannot be created "on-the-fly" from within a Takeoff Item, so we set up Layers first.

 The Takeoff Tab Status Bar and Zoom Controls