When you are drawing polygonal area takeoff, just like when drawing Continuous Mode linear takeoff, you can draw curved segments.
When you are drawing a polygon area takeoff (previous article), to instruct the program that the next segment is to be a 'curve', press one of two keys:
- A - as in "arc" - creates an arc that is a section of an oval, defined by three points; the legs of the arc could be extended out without ever touching, or
- R - as in "round" or ciRcle - creates a (rounded) arc that is a section of a circle, also defined by the three points, however, the "legs" of this section would complete a circle if they continued
Creating an Arc Curved Segment (not a section of a circle)
As you are drawing a polygon,
Before you draw a segment, press "A" on your keyboard, this sets the last point you clicked as the first endpoint of the arc.
Now that you are in "arc-mode", the next two points you click define the midpoint and second endpoint of the arc.
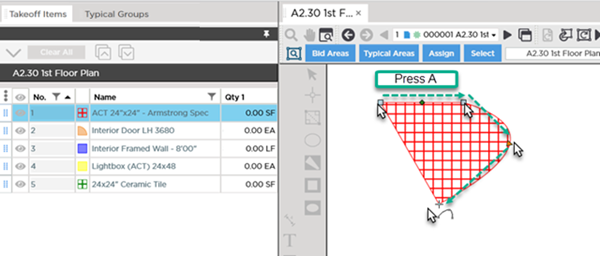
The "legs" of this arc, if extended, could on to infinity, unlike a "rounded arc" (next) which is a section of a circle.
After closing (completing) the Area takeoff object, you can go back and you can click on either of the endpoints of this curved segment or the midpoint to adjust the arc.
Drawing a Rounded-Arc Curved Segment (a section of a circle)
As you are drawing a polygon,
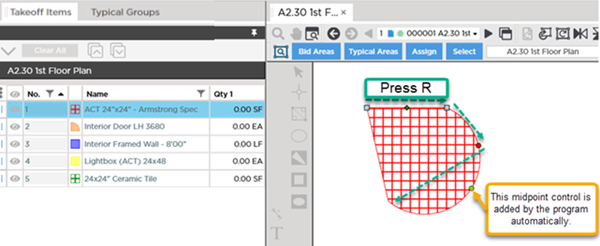
Before you draw a segment, press "R" on your keyboard, this sets the last point you clicked as the first endpoint of the Rounded-arc.
Now that you are in rounded-arc mode, the next point you click defines the midpoint - where your arc intersects.
The third click defines how much of the circle is drawn.
As you move the final point, the section of circle drawn is increased or reduced, always intersecting the midpoint (increasing or decreasing the diameter of the theoretical circle).
After closing (completing) the takeoff (double-clicking the last point) you can go back and click on either of the endpoints of this curved segment or the midpoint to adjust the Rounded-arc.
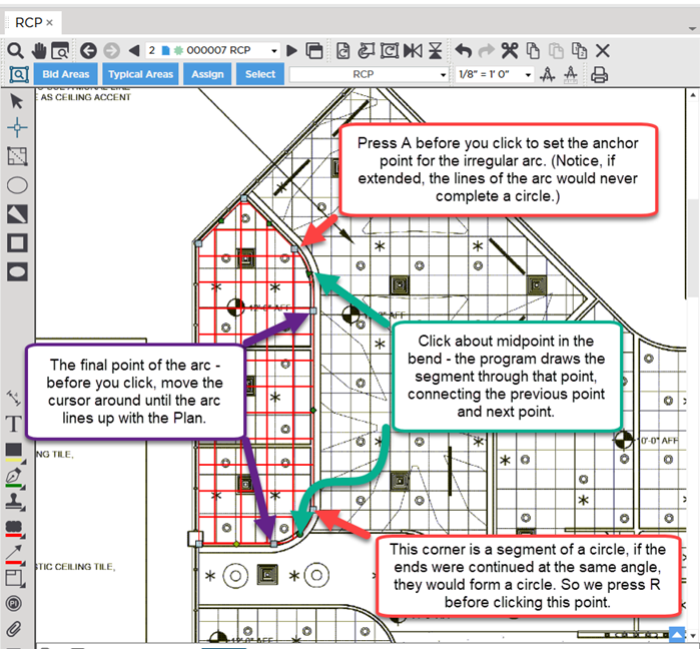
Practical Example
If you look at the object we took off in the screenshot below, you can see it includes both an Arc and a Rounded-arc.
It takes a little practice but just remember - if extending the ends of the arc completes a circle, use "R" (ciRcle), if they do not, use "A" (Arc).
And you can always hit ESC on your keyboard to back up to the point before the arc to start again.
If you try to complete (or close) an area takeoff nothing seems to happen when you double-click or the object turns yellow with a bolded red outline, that means you have drawn an "uncloseable" object.
You need to backout the object by pressing the ESC key until you find the point where you crossed lines and try again. See the next article for more details.
Before drawing any
takeoff, you must set and
verify Scale, see Related Articles for more information.

 Polygon Area Takeoff Tool (Drawing Complex Shapes)