and takes just a few seconds.
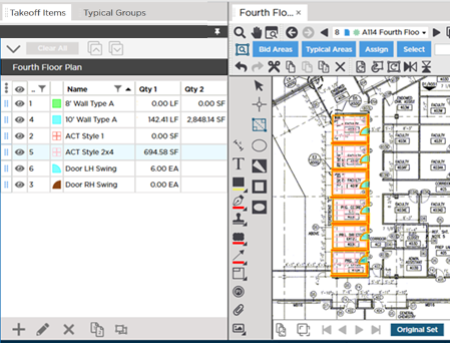
We took off the second floor of a building with 8' high walls, a 2'x'2' gridded ACT ceiling, and right-hand swing doors. The fourth floor of this building has the exact same layout, but the ceiling is 10' high, the ceiling is a 2'x4' grid, and the doors swing to the left. (This is a extremely simplified example, just to showcase the functionality.)
Step 1 - Copy Existing Takeoff
As you can see, we created the first Takeoff Items (8' Wall Type A, ACT Style 1, and Door RH Swing) but have not created the 10' Wall Type A, ACT 2'x4', or LH Swing Door Takeoff Items yet. If the Takeoff Items to which we wanted to reassign takeoff already existed, we would simply "Reassign" the takeoff - see Reassigning Takeoff from One Takeoff Item to Another Existing Takeoff Item (that is done one by one).
Navigate to the page where the takeoff exists (the 8' floor plan),
Assuming we want to copy over all the takeoff for the Takeoff Items we are going to duplicate,
- Select the Takeoff Items (hold down Ctrl while clicking to select a range or Shift to select Takeoff Items individually)
- Click the
 button or Press Ctrl+T (see Related Articles for more information on selecting the object(s) you want to assign to a new Takeoff Item)
Notice all the objects for the selected Takeoff Items becomes selected.
You do not need to use the "Select Objects" button or context-menu option. You can select whatever
takeoff on the source
Page you want to copy/paste - whatever you copy and paste to the new
Page is used with Duplicate and Reassign.
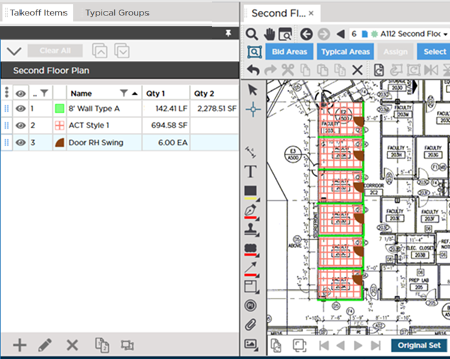
For this example, we only took off a few walls, ceilings, and doors so you can see how this works, but in reality, you could select all takeoff on the Page for the three Takeoff Items (select the Takeoff Items and press Ctrl+T). See Related Articles for more information on selecting the object(s) you want to assign to new Takeoff Items.
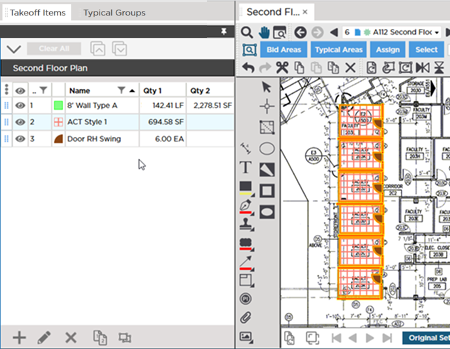
Notice, the takeoff is selected, it is highlighted in yellow.
- Click the
 button on the Edit toolbar (or right-click and select Copy or press Ctrl+C on your keyboard) to copy the takeoff objects into memory.
Step 2 - Paste Takeoff
- Navigate to the Page that represents the 10' floor plan on which you want to paste this takeoff - we assume you have not performed takeoff on this Page already, which is why the Takeoff Items don't already exist
- Click the
 button on the Edit toolbar (or press Ctrl+V on your keyboard) to paste the takeoff objects from memory
It is best not to use the right-click method to paste because you end up having to move the
takeoff more, if you use the Paste button or Ctrl+V, the
takeoff is pasted in the same relative location as the source
Page.
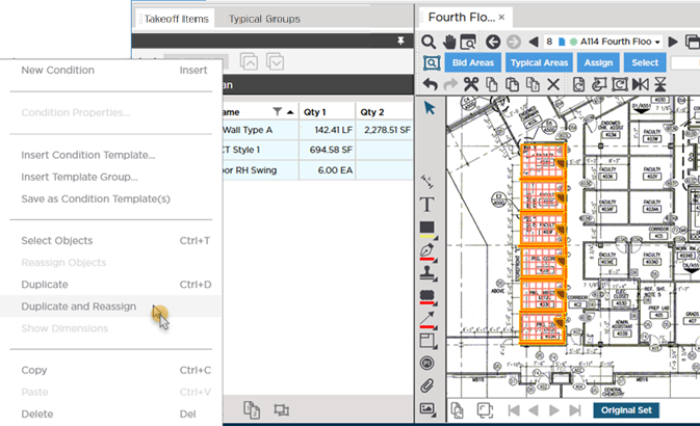
Step 3 - Duplicate Takeoff Items and Reassign Takeoff (easy part)
Now, it is time to select the Takeoff Items and let ConstructConnect Takeoff do the heavy lifting.
- In the Takeoff Items Pane, select the Takeoff Items whose takeoff you just pasted on this Page
- Right-click within the Takeoff Items Pane
- Click "Duplicate and Reassign Objects" from the Context Menu
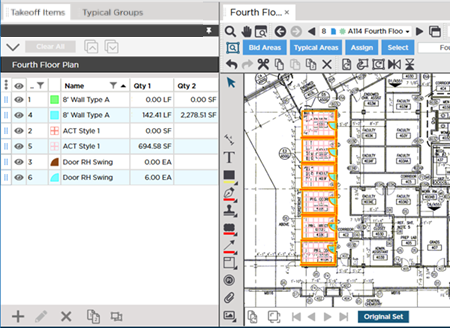
The program:
- Creates an exact copy of each original Takeoff Items (except for Number and Color)
- Re-assigns all the selected takeoff objects on the current Page for the original Takeoff Items to the new Takeoff Items
Duplicate and Reassign affects all
takeoff for the select
Takeoff Items
but only on this Page.
What the program is doing is one-by-one, creating a duplicate copy of the first Takeoff Item, reassigning its takeoff, then repeating for each Takeoff Item. While this is happening, you will see status messages flash at the bottom of the screen. Depending on the number of Takeoff Items and takeoff objects you are duplicating and reassigning, this process may take a few minutes.

Step 4 - Align Objects
While the pasted takeoff objects are still selected,
- Align the takeoff objects to the Plan
If this Page is laid out the same as the source Page, and you used the button or the keyboard shortcut Ctrl+V, the takeoff should be aligned correctly already.
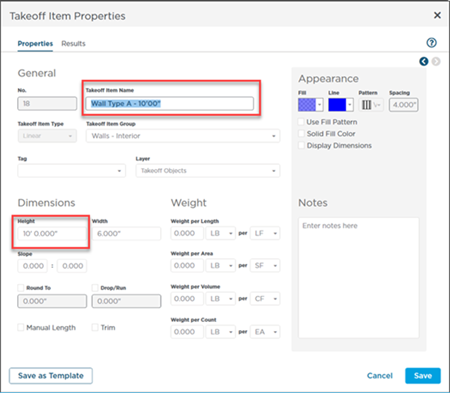
Step 5 - Adjust New Takeoff Item Properties
You must update the new Takeoff Items' Properties to account for any changes in height or other dimensions such as grid.
- Open each Takeoff Item's Properties and make whatever adjustments are necessary (Height for linear Takeoff Items, Grid Size for Areas, and Shape for Counts).
After you make all the updates to your new Takeoff Items, the Results are re-calculated.
Shortcut to Changing Height for One or More Takeoff Items
If you just need to change the Height (Linear Takeoff Items) or Thickness (Area Takeoff Items) for one or more Takeoff Items, select the same Type or Takeoff Objects, right-click it and select "Set Height/Thickness".
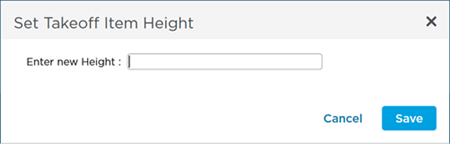
This way, can set the same Height (or thickness) for one or more Takeoff Items (of the same Type) without having to open each Takeoff Item's Properties window. So, for example, if you had several Linear Takeoff Items set to 8'00", you could easily set them all to 10'00" using this right-click method instead of one at a time.
Duplicate and Reassign affects
all the takeoff on the current Page for the selected
Takeoff Items -
there is no need to select objects nor is there any way to select "some" of the takeoff to reassign. Takeoff objects on other Pages in the
Bid remain associated with the original
Takeoff Items.

 Duplicating a Single Takeoff Item and Reassigning Its Takeoff